
|
I have been practicing Bikram yoga for 1.5 years. My beautiful wife Sophia has been doing it for years, and seeing the difference it makes in her life made me want to try it.
I have gotten numerous benefits from Bikram, starting with the common, increased strength, stamina, pain relief and flexibility. More surprisingly, I have developed a better sense of listening, contemplation and patience. With all the physical improvements, I am most proud of conquering my mind. Everything in my life has improved since I started Bikram yoga. Love, sex, relationships, work, even my tolerance of society. My skateboarding and surfing are more focused and I can target my aggression in productive ways. My Bikram yoga practice has helped me to improve my agility and recovery time, which has left me feeling like I have a long, long time to keep doing all the activities I enjoy. I think Bikram yoga is the key to longevity in all areas! The thought I have in the room that keeps me going is: solace. I want to thank Kay for this great honor of asking me to share my story, my wife for enhancing my life and the East Coast for making me strong. Love, Strength and Peace. -Wes
0 Comments
Don't miss attending our Posture Clinic with Josh on Saturday, October 13! Free for BYSJ members, $20 everyone else.
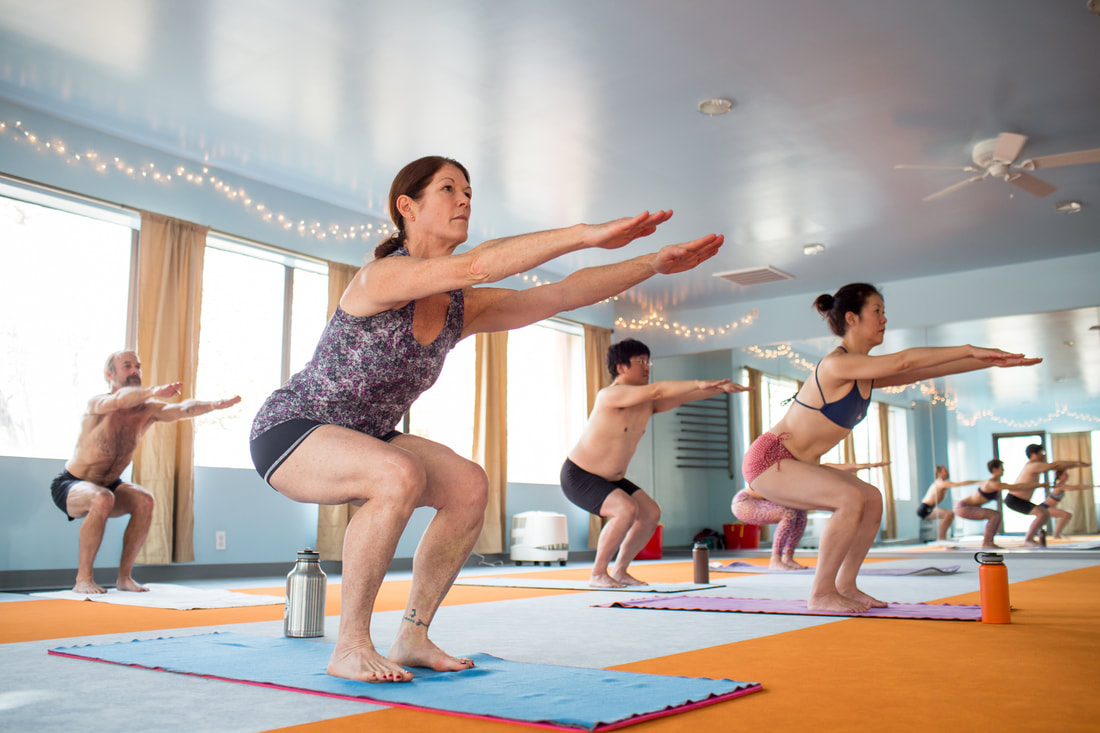 In the Bikram yoga system, we do the Awkward Pose in three parts. Here's a quick rundown of what to do in each one, how to do it, and why you should even care...
Even on its own, the first part of Awkward pose is an excellent all-around exercise, reminiscent of a squat you might have done at the gym (though Utkatasana has been keeping leg and butt muscles buff muuuuuch longer than the gym!) How to do Part 1: Step your right foot to the right about 6 inches, keeping your feet exactly parallel to one another so your heels stay invisible behind your toes. Keep in mind that in Bikram yoga "6 inches" varies from person to person! Basically, your heels should be directly underneath your hip joints. This alignment is important to make sure that when you sit down into the pose, pressure is distributed evenly in the hip, knee and ankle joints. Bring your arms up parallel to the floor with palms facing down and all 5 fingers together. Stretch your arms forward toward the mirror, exhale and suck your stomach in, then hold it in while you sit your hips back like you're sitting into a chair that's a bit too far behind you. Keep your spine straight to begin with and maximum body weight on your heels. It's normal if your upper body has to come forward a bit so you can sit your hips back. Once you're in the chair, lift your chest up and bend your total spine backward to bring your upper body back. (Tip: if you *can't* lift your chest up, you're probably sitting down too low- come up a little bit and try again.) Suck your stomach in and lean back into the heels even more, keep your chest up, lean back even more until you almost fall down backwards! Get psyched for Part 2: The second part of Awkward Pose is super challenging for a lot of people- so if your ankles are wobbling or your thighs are shaking, you are definitely not alone. The best tip for you is: don't skip it, and don't hold back from fear of falling or not being able to hold it the whole time. You have to start somewhere, and no one will laugh if you fall (most of us have been there!) Part 2 is great for increasing leg and foot strength as well as stretching out the feet, so give it all you've got and it will give you some nice-looking gams and great-feeling dogs in return! How to do Part 2: First stand up on your tippy toes and stretch your whole upper body up to the ceiling. Suck your stomach in and sit down as though you are sitting into a chair that's right underneath you. Be sure to sit down until your hips are in the chair, keeping your spine in a straight position. If you can only hold it that low for 2 seconds at first- be proud of your achievement! Little by little, you will build endurance- but only if you try the right way and you don't give up. How to do Part 3: By the 3rd part of Awkward pose, your legs are already well warmed up. Come up a little bit on your toes and bring your knees together, being sure to keep your heels behind your toes. Exhale breathing and sit down as slow as possible, keeping your knees together and your spine in a straight position. Sit down all the way onto your heels, then stretch your spine up towards the ceiling to make a half-inch gap between your hips and heels. Keep your knees together and forward, thighs parallel to the floor, arms parallel to the legs, spine straight so from the side you look like a 3-sided box. Here's the hard part: inhale breathing and slowly come up while keeping your spine straight. This requires you to really concentrate and connect with your lower abdominal muscles (to keep your hips from going back and upper body tipping forward) as well as tremendous thigh strength (and determination!) to keep your knees together. "But my knees!!" If you are suffering from knee pain, have a recent knee injury or have limited range of motion in your knees, here are a couple special tips for you in Awkward:
Why to get Awkward: All three parts of Utkatasana are excellent for improving blood circulation in the ankles, knees and hips. This pose strengthens the thighs, calves and hips muscles while improving flexibility of the hip, knee and ankle joints. Awkward helps relieve symptoms of rheumatism, arthritis and gout. It's also great for toning lower abdominal muscles, pelvic floor and the triceps muscles of the arms. Not to mention, it sure gets your heart rate up and is often the point in class where you'll really start sweating, making sure your limbs are nice and slippery for the next posture...  Q: What if my forehead will never touch my toes?
A: Short answer: it doesn't matter. If you've been to my class (or if you've been reading this blog) you've probably heard me say/write something like "the goal is not the real goal." So while the "goal" of this posture as we say it in class is to touch your head to the feet- really the real goal is what happens along the way, the effect you create in your body simply by trying the right way. In this posture, the real goal is 360-degree-angle stretching, coccyx to toes, coccyx to head. Q: Why do we grab the big toes only? I'd rather grab my feet! A: Grabbing just the big toes ensures you create the 360-degree-angle stretching. Here's how it works: Because your only grip is on the toe, you are forced to use the fronts of your legs muscles (quadriceps and shins) to flex the feet and get the heels off the floor. Contracting the fronts of your legs means the backs of your legs can truly stretch from coccyx to the toes. When you pull the toes with your heels off the floor and stretch your body forward from the lower spine, you also stretch your spine from coccyx to the neck, creating 360-angle stretching. If you grabbed your feet from outside or the top (though it might seem more comfortable!) you wouldn't get that stretch to the lower back. As is so often the case (sigh) the uncomfortable way is the right way! So grab your big toes. ;) The best way to learn any posture and experience for yourself the benefits it has to offer is to come to class on the regular (3-5 times a week is best) and make your body smile. Got other questions? Ask one of our certified instructors next time you are in for class- or drop us a line in the comments below! |
AuthorHHY Founder, Yoga Business Coach, yoga-doer and life-lover, Kay Afif! 
Categories
All
|
 RSS Feed