
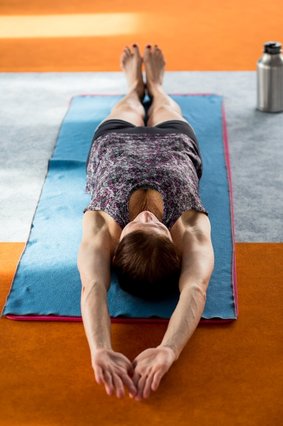
 The Sit Up is not exactly a "posture" so much as a highly effective transition exercise. It moves you from your back into a forward-facing floor pose, and it's great for strengthening and toning your abdominal muscles, for sure. The Sit Up is also a breathing exercise: by taking that deep inhale followed by pulling your abs in to cause two strong exhales through the mouth, you use your muscles to "flush" your lungs. Exhaling fully like that leaves you feeling fresh and energized for the next posture!
To do the Sit Up, begin lying on your back. Raise your arms so your biceps are next to your ears and cross only your thumbs with your palms facing the ceiling. Engage the fronts of your thighs and shins to flex your feet like you're standing on the back wall, toes toward your face. Keep your arms and head together, your heels on the floor. Take a long, deep inhale as you begin and hold the breath in until you get to the forward bending part. Keep your chin toward your chest as you sit up, keeping your arms and head together and your heels on floor. The Sit Up (until you get your head to your knees the first time) should be one continuous motion. When you're up and on your way forward, reach out to grab the big toes with your middle and index fingers, exhaling strongly once by pulling your abs in as you touch forehead to your knees. That first exhale will cause you to "bounce" up away from the knees- so exhale the same way another time and touch your forehead again to complete the double exhale. The more powerful your exhales, the more energy you will have for your next posture. This is the best (and cutest) visual demonstration we've found, from yoga champion Joseph Encinia. One of the best ways to learn more about the postures is to read Bikram's "Beginning Yoga Class" book. Attend class 3 to 5 times weekly to put your learning into action and make your body smile!
0 Comments
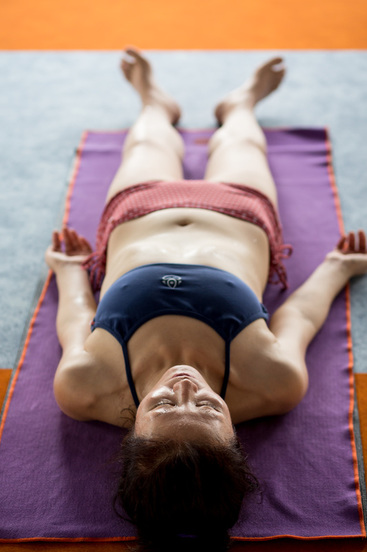 Savasana (Dead Body Pose) At the end of the standing series, you may feel great relief to hear the word "savasana!" During the first half of class, we awaken and warm up our muscles, ligaments and skeletal system. The first savasana gives us a chance to relax the entire body and prepares us to get deeper into the internal organs during the floor postures.
Think of this long savasana as the "dress rehearsal" for the 20-second savasanas you will do between each set of each posture during the floor series. Take a moment to make your adjustments, get comfy- then try your best to be absolutely still for a couple of minutes. Just like any other posture, if you "fall out" (for example, if you fidget or wipe your sweat) just take a breath and try again. Start with your legs straight and heels together, then let your feet fall open to the side. It's ok if your heels don't remain together when you relax the legs- we just touch the heels to be sure your legs are aligned with the center of your body. Start with your arms on the towel by the sides of your body with your palms facing up. (Don't worry if your palms don't stay that way- they will with time and practice! For now, you can try adjusting your shoulder blades down your back to help keep the shoulders open.) Keep your head straight, your eyes open and breathe normally through your nose. Completely relax everything. The purpose of savasana during hatha yoga class is to allow your circulation, heart rate and breath to return to the normal position before you start the next posture. The stiller you can be, the better! Sometimes doing "nothing" is very difficult... like any skill, it takes practice. One great thing about savasana is you can practice it pretty much any time! Not only is savasana an excellent skill to learn for getting the most out of your yoga- it is an invaluable skill for your life outside the room as well. Be sure to rest at least a couple of minutes at the end of class in your final savasana, letting every part of you relax totally before you move on with your day. One of the best ways to learn more about the postures is to read Bikram's "Beginning Yoga Class" book. Attend class 3 to 5 times weekly to put your learning into action and make your body smile! 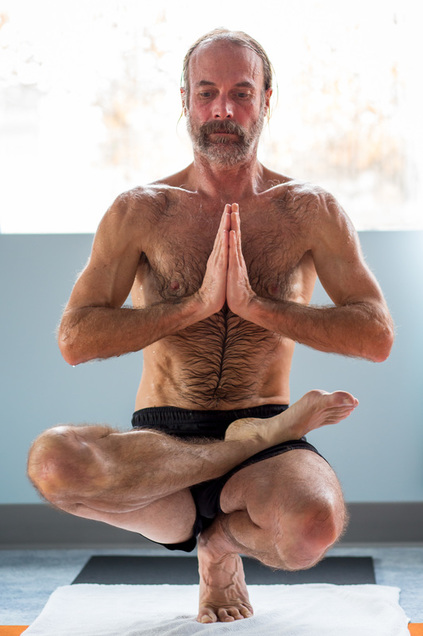 Toe Stand Pose / Padangustasana Here we are at the last posture of the standing series- Toe Stand. Sometimes fear will come up as a new student when first learning this posture. Once you realize that there is nothing to fear, progress can happen very quickly. This posture is so great for the knees and hips- especially building strength around the knees, which are one of the hardest parts of the body to strengthen. It's also pretty super for developing mental strength.
To do Toe Stand, simply start in a standing position. Find a spot four feet in front of you on the floor. Keep your focus on that one spot. Bring your foot up just like Tree pose, keep your standing leg straight, then bend forward until your hands touch the floor. It is best to have your hands a little forward of your foot so you can lean your weight into the hands. With the weight on the hands taking the pressure away from your standing knee, slowly bend your knee and sit down on your heel, balancing on your toes. Remember that as long as you try your best you get 100% benefit: if all you can do today for Toe Stand is focus on the floor, or work on grabbing your foot, do that! Keep focusing on that one spot on the floor. If you look in the mirror there is a greater tendency to lose your balance. Plus, you just spent the entire standing series looking in the mirror! This is a chance to practice feeling your body's position in a different way. Once you are sitting on your heel, bring your hands back to the side of the hips. At first just bring your left hand up, keeping your balance with the right hand. Next, bring your right hand up and put your hands in prayer position. Stretch your spine towards the ceiling, still focusing on the floor with your eyes. Before you know it, you will be balancing on your toes! When you are ready, put your hands on the floor in front of you and come up slowly, the opposite way you went down. Give yourself a nice smile in the mirror, then get ready to relax in savasana... you've earned it! One of the best ways to learn more about the postures is to read Bikram's "Beginning Yoga Class" book. Aim to join class 3 to 5 times a week to practice what you learn, and you will definitely make your body smile. 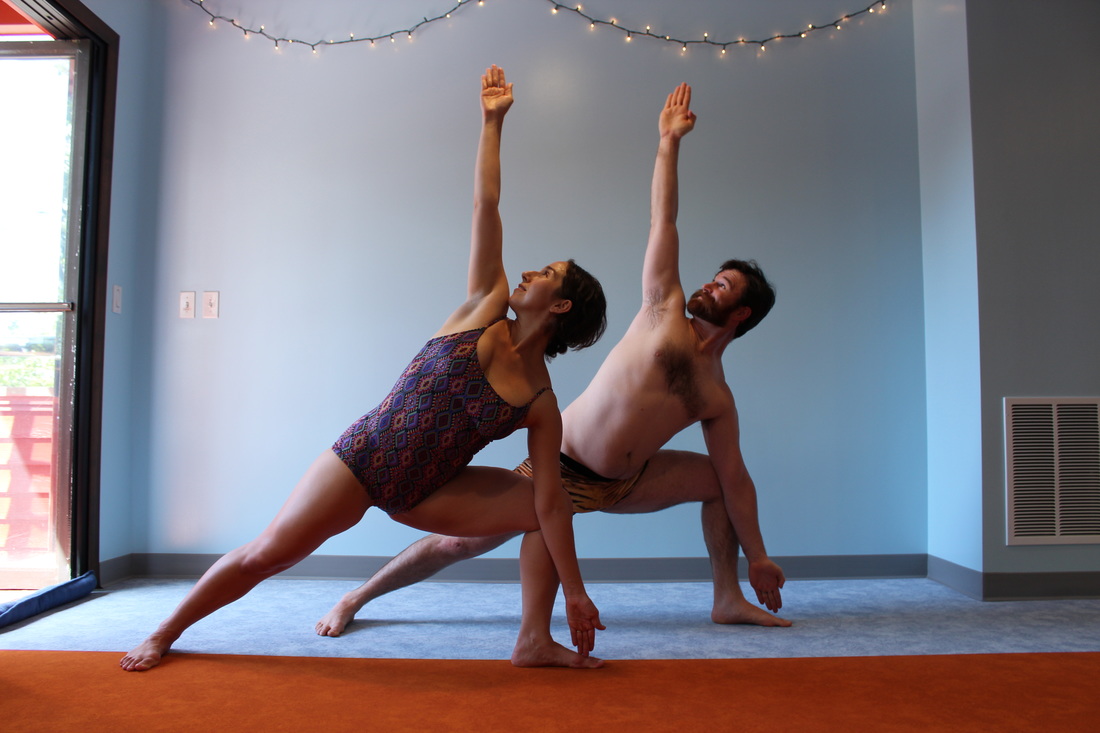 Can you believe how much your thighs burn in this posture? Or how hard it is to keep the straight leg from slipping? And then, the teacher seems to keep holding this posture forever! What's a yogi to do? Ah, the sweet sensation of stretching and strength with sweat running down your body...
Triangle pose firms thighs and waist, opens hips, and helps alleviate rheumatism, lumbago in the lower spine and frozen shoulder. Practicing this posture regularly helps correct chemical imbalances, relieves constipation, normalizes low blood pressure and improves cardiovascular function. By exercising the circulatory, digestive, immune, reproductive, respiratory and muscular systems, triangle pose targets and benefit every part of your body! (Maybe that's why it feels like we hold it forever!) Here are a few tips to remember:
Once your total foundation is in place, the next step is to move your both arms, making sure that the elbow is directly in front of the knee and the fingers are stretching down to touch between the big and second toe. Then turn your head and look up while stretching your arms in opposite directions. Simple, right? Ok, you got us: it's a tough one! Remember that, really, all you have to do is try the right way. Do the best you can, breathe normally and hold absolutely still without moving. That's it. Enjoy..!! One of the best ways to learn more about the postures is to read Bikram's "Beginning Yoga Class" book. Attend class 3 to 5 times weekly to put your learning into action and make your body smile! |
AuthorHHY Founder, Yoga Business Coach, yoga-doer and life-lover, Kay Afif! 
Categories
All
|
 RSS Feed